Wednesday, May 23, 2012
Monday, May 21, 2012
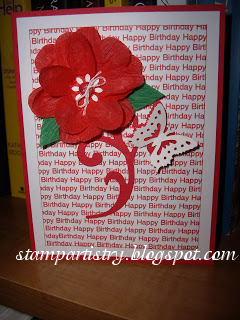
And, another card for a girl in my church who is turning 16 this month. The BG paper is from the Floral Prints Mat Stacks. The flower is in my stash without a name on it, but you could use any flower you have on hand. I stamped it, colored it with colored pencils, cut it out, distressed the petals with a stylus, and raised it up with double sided foam tape. I made the leaves with a cut die: Marianne Design Creatables Stencil - Flower & Leaves LR0156. The tag punch is from EK Success. I made the butterfly at the bottom from two 1" pieces of crepe paper, folded, and then glued onto a dragonfly punched piece of paper. I raised it up with foam tape also. I added a little glitter and called it a card!
Friday, May 18, 2012
Thursday, May 10, 2012
I actually started out with this very plain online free image (see next image down) and added some tangles to it! Isn't it cool!!! I am sooooo fascinated by this technique! I just recently found this media online and couldn't wait to try it. Well, here's my first real attempt! I did practice a little first on scraps of paper, and just a couple of days ago decided to give it a try. In the very center of the flower I did add some yellow glitter which is a little hard to see in this photo. This is a really fun way to decorate your stamped images and/or stencils. Online there are LOTS of examples of how you can doodle in rubber stamps, stencils, and/or make your own frames to doodle in. Even the lines on the frames don't have to be straight - they actually look better crooked, so there's no intimidation about doing it. The cool thing about this is that there really are no mistakes...because no one's really going to notice it. The ideas are endless and it's sooooo fun and relaxing. It's really quite easy...If I can do it, anyone can!
Here's another card I decoupaged with a free decoupage set from online. I LOVE the way this card turned out. It is sooooo cute! For the wood background I started out with a free online image of a piece of wood. I printed it out, cut it to the size I wanted, and then ran it through my "looks-like-wood" Cuddlebug embossing folder (It's not really called that!). Then I distressed it with some distressing ink. The little image on the bottom right was another free image from online. I did the "Happy Birthday" in my card program, punched it out with my oval punch, distressed it, and added some little red brads.
* I wish the dies and the embossing folders had the names on them, but they don't and I haven't kept all the papers that came with them...too much "stuff" to keep!
* A special thank you to all you wonderful people who provide so much for us card makers online! The possibilities are endless!
When I get a chance I'll try and search out the names of my dies, because - inquiring minds want to know!!!
Note: I used to store my dies loose in a little 4" x 6" photo album and if there were several pieces in one set, sometimes it was hard to get them out, or they would fall out when I didn't want them to. Well I've gotten organized with my dies! Now I use a little piece of drafting tape to adhere each die to either a piece of card stock, or a piece of clear acetate, that is cut just a little smaller than the 4" x 6" so that it slides easily out of the sleeve of the photo album. The drafting tape is wonderful because it doesn't stick tightly when you want to use your die and the tape is reusable. For an example, Spellbinder's Floral Flourishes is a seven-piece set and some of the pieces are small. With my organized way of storing my dies, I can now see at a glance exactly what is in each sleeve of the album!
This is a birthday card I recently gave to a friend of mine and I told her that originally this was a mistake! She said, "I wouldn't call THIS a mistake!" She loved it!
In this card I made the flowers out of light-weight vellum paper and ran them through Cuddlebug's Swiss Dots embossing folder.
Note: The bling in the center of each flower. These were plain/clear and I colored them with alcohol ink. So much cheaper to purchase non-colored bling and color it yourself!
Another rectified 'mistake' done with purple background paper.
Friday, May 4, 2012
Subscribe to:
Comments (Atom)


